(10-01-23) Blog 10 – Enhancing the Pi-hole
Welcome back! If you’ve been keeping up with these blogs, by now you should be very well versed in what a pi-hole is and what it can do for your web browsing experience.
In this installment, I’ll be exploring how you can take your pi-hole experience to a whole new level with the addition of your own DNS resolver service.
Unbound
Before I dive into how to install unbound, let’s just have a quick reminder of what the pi-hole is designed to do.
If you remember, the pi-hole is a utility that checks all the DNS queries being sent by the devices in your network which are configured to use the pi-hole as their DNS resolver.
When a query is received by the pi-hole, it checks to see if the domain in the URL is on either a block list or an allow list. If the domain is on a block list, the pi-hole returns a value of 0.0.0.0 to the device which means that the device now makes a request for data from a machine with an IP address of 0.0.0.0 instead of the real IP address for the domain.
Thus the device never receives any data back – therefore – no adverts, etc.
If the domain is not on any block list, or is explicitly included on an allow list, then the query is passed to whichever DNS resolver is specified in the Pi-hole.
The DNS resolver data is found on the Pi-hole dashboard in the settings –> DNS page.
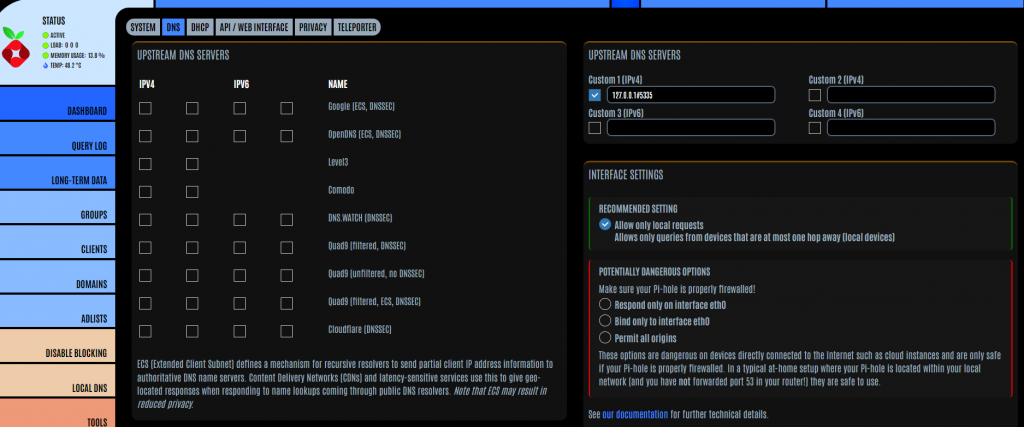
When you install the pi-hole, typically, the settings will use Google as the upstream DNS resolver service, so when your pi-hole allows a DNS query to be processed, it will hand it to Google’s servers which will look up the real IP address for the domain.
Now, whilst this is absolutely fine in the respect of having your Queries handled, and there is an argument which says that Google is a good choice for DNS requests because they regularly check all domains to see if they are safe. It does mean that you are giving Google information about the browsing you are doing, which for some people is a bit too much.
As such, you can opt to use a different DNS resolver service such as Quad9, or OpenDNS. These systems don’t collect and use your query data in the same way Google do, so are considered a more suitable choice for some.
Whichever DNS resolver service you use is up to you, but in all cases, you have to understand that you are giving away information about your browsing habits to a commercial entity, and they can do whatever they want with that data.
This is where unbound comes to play.
Unbound is a DNS resolver service you operate yourself, thus cutting out any commercial entities.
Installing the unbound service onto your pihole is almost as simple as installing the pi-hole itself.
Installing Unbound
First thing to do is to connect back to your raspberry pi operating system.
When I built my raspberry pi, I installed Ubuntu as the OS and then I enabled the SSH utility which means I don’t need a dedicated keyboard, mouse & monitor for the device.
You might have done something similar with yours, or maybe you do have a dedicated keyboard, etc. for it.
For these examples, I will install unbound on a different raspberry pi which I connect to via a RDP connection.
Whichever way you connect to your raspberry pi works, but once there, you need to get onto the machine and open a terminal.
If you are the root user of the raspberry pi, you should be able to simply type:
apt install unbound
If you are not root, then you will need to use the sudo option
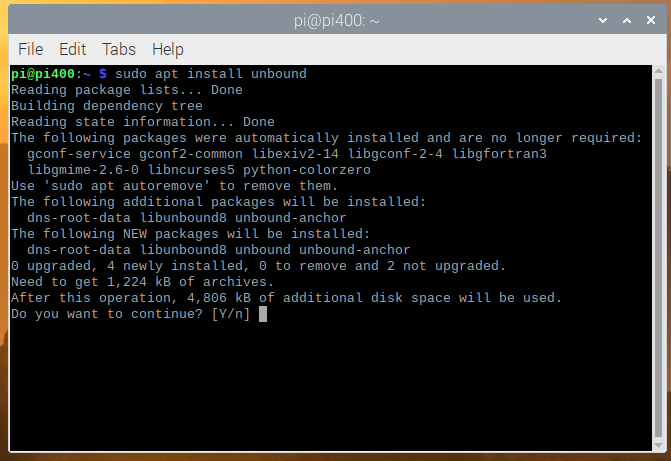
sudo apt install unbound
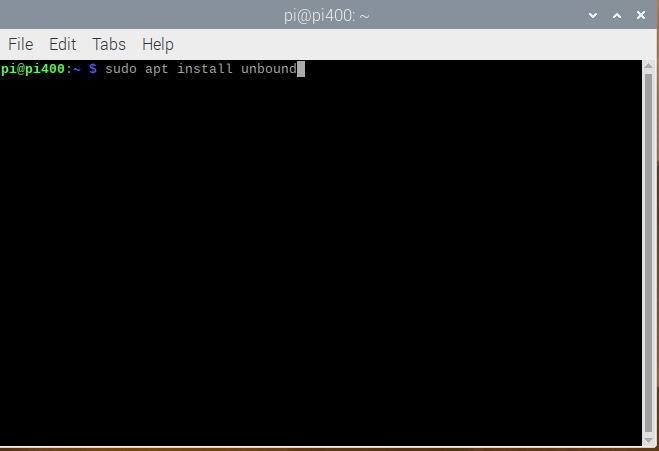
When prompted, enter Y to continue with the install
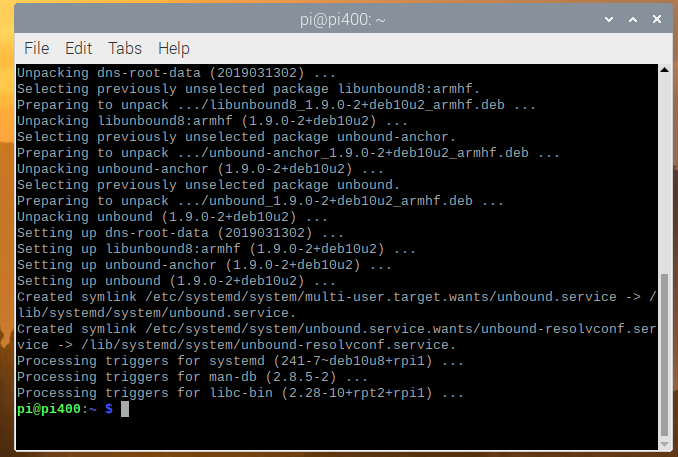
During the installation process, unbound will automatically add a roots hints file which is what it uses to identify the root DNS servers it will use when processing your queries. For info about the roots hints file, and how DNS recursive DNS actually works see my blog on DNS here
And that’s it – You’ve installed unbound!
Configuring unbound
Before you can use the unbound service, you need to do a bit of tweaking to get it working properly and safely.
To do this we need to create a configuration file with all the settings it needs to work
Change the directory so that you are located in the /etc/unbound/unbound.conf.d folder.

Create a new file with nano (or a similar text editor) and call the file pi-hole.conf. Note, you will most likely need to use sudo here.

Copy the following data into the file:
server:
# If no logfile is specified, syslog is used
# logfile: "/var/log/unbound/unbound.log"
verbosity: 0

interface: 127.0.0.1
port: 5335
do-ip4: yes
do-udp: yes
do-tcp: yes

# May be set to yes if you have IPv6 connectivity
do-ip6: no

# You want to leave this to no unless you have *native* IPv6. With     6to4 and
# Terredo tunnels your web browser should favor IPv4 for the same    reasons
prefer-ip6: no

# Use this only when you downloaded the list of primary root servers!
# If you use the default dns-root-data package, unbound will find it    automatically
#root-hints: "/var/lib/unbound/root.hints"

# Trust glue only if it is within the server's authority
harden-glue: yes

# Require DNSSEC data for trust-anchored zones, if such data is absent, the zone becomes BOGUS
harden-dnssec-stripped: yes

# Don't use Capitalization randomization as it known to cause DNSSEC issues sometimes
# see https://discourse.pi-hole.net/t/unbound-stubby-or-dnscrypt-proxy/9378 for further details
use-caps-for-id: no

# Reduce EDNS reassembly buffer size.
# IP fragmentation is unreliable on the Internet today, and can cause
# transmission failures when large DNS messages are sent via UDP. Even
# when fragmentation does work, it may not be secure; it is theoretically
# possible to spoof parts of a fragmented DNS message, without easy
# detection at the receiving end. Recently, there was an excellent study
# >>> Defragmenting DNS - Determining the optimal maximum UDP response size for DNS <<<
# by Axel Koolhaas, and Tjeerd Slokker (https://indico.dns-oarc.net/event/36/contributions/776/)
# in collaboration with NLnet Labs explored DNS using real world data from the
# the RIPE Atlas probes and the researchers suggested different values for
# IPv4 and IPv6 and in different scenarios. They advise that servers should
# be configured to limit DNS messages sent over UDP to a size that will not
# trigger fragmentation on typical network links. DNS servers can switch
# from UDP to TCP when a DNS response is too big to fit in this limited
# buffer size. This value has also been suggested in DNS Flag Day 2020.
edns-buffer-size: 1232

# Perform prefetching of close to expired message cache entries
# This only applies to domains that have been frequently queried
prefetch: yes

# One thread should be sufficient, can be increased on beefy machines. In reality for most users running on small networks or on a single machine, it should be unnecessary to seek performance enhancement by increasing num-threads above 1.
num-threads: 1

# Ensure kernel buffer is large enough to not lose messages in traffic spikes
so-rcvbuf: 1m

# Ensure privacy of local IP ranges
private-address: 192.168.0.0/16
private-address: 169.254.0.0/16
private-address: 172.16.0.0/12
private-address: 10.0.0.0/8
private-address: fd00::/8
private-address: fe80::/10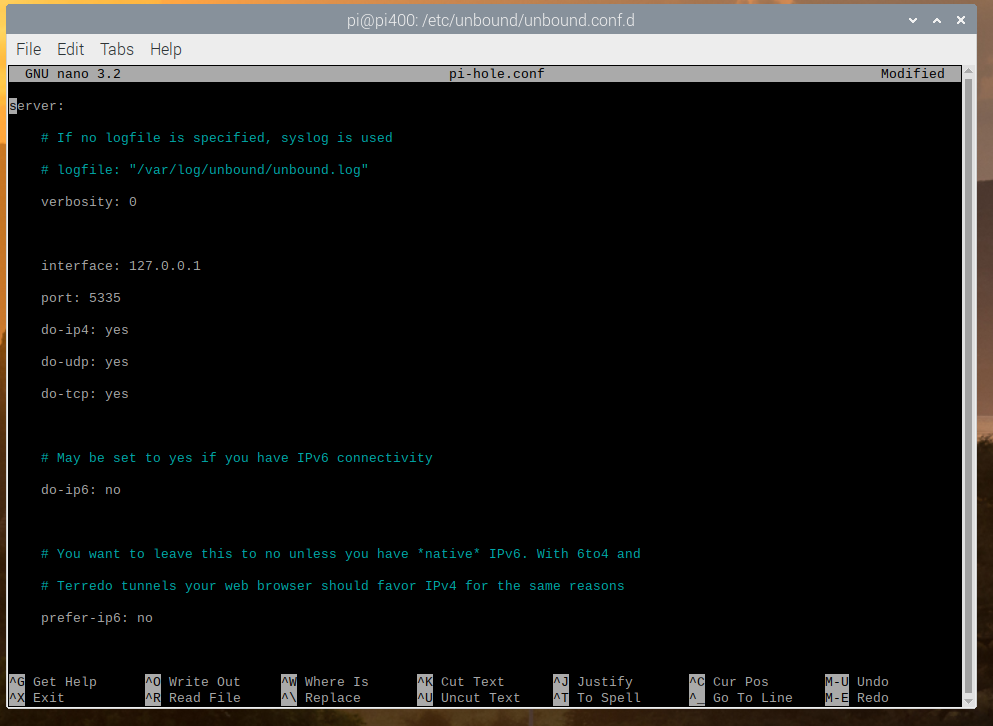
Save the file by pressing CTRL+X, and press Y to save the data buffer. Press enter to save the file with the name you specified at the start.
Once the file has been created, check that it is working. To do this, first restart the unbound service so that it uses the new config file.

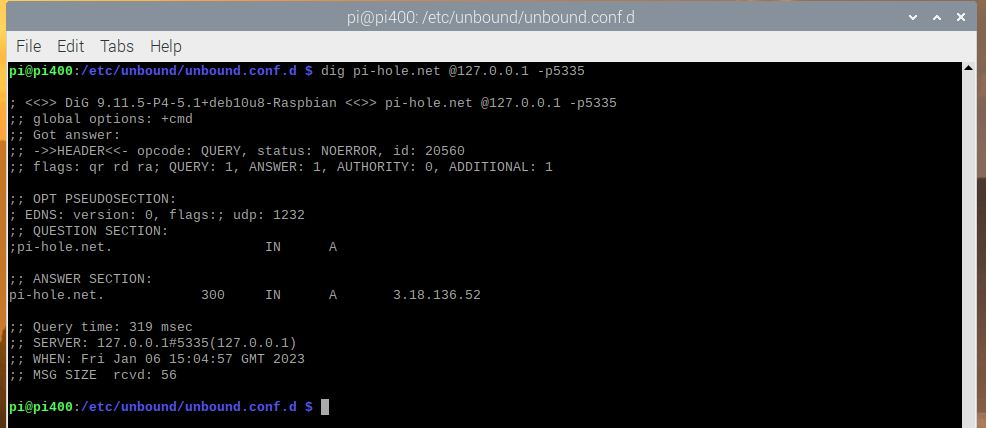
Once restarted, use the dig command to query an IP address.
The unbound service will be configured to listen on port 5335, so your syntax for the dig command will be as shown in the screenshot below:

If all is working correctly, you should receive a response like the one shown below:
Now it’s time to get your pi-hole to use it!
Configuring the pi-hole
On your pi-hole dashboard, navigate back to Settings –> DNS and in the Upstream DNS servers section enter the details as shown below:
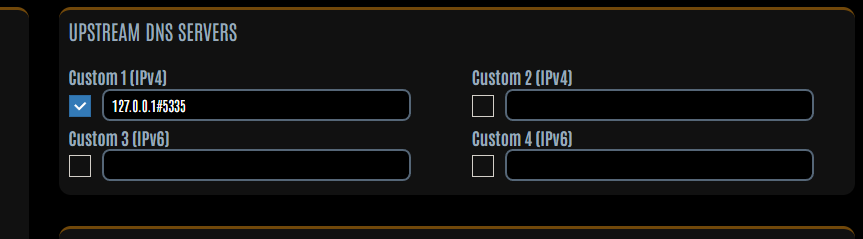
Don’t forget to scroll to the bottom of the page to save the changes
Now, whenever a DNS request is made, your pi-hole will pass any allowed queries to the unbound service for resolution.
In the next and final installment of this series of pi-hole blogs, I’ll explain how you can access your pi-hole from anywhere in the world via the use of a dedicated VPN.
See you later!