(04-01-23) Blog 4 – Blocking ads and more with a Pi-hole
For blog number 4, I thought I’d turn my attention to something I believe is a must-have in every home network – A Pi-hole
I’ll get on to exactly what a Pi-hole is and why you should have one in a minute, but first I must state that this will be a mini-series of blogs as there is so much to talk about when it comes to this topic, so this might take up blogs 4, 5, 6 and maybe even blog 7! So if you find this topic interesting, keep on reading for the next few days…
So – what is a Pi-hole?
In simple terms, a pi-hole is a utility that checks the web requests from the devices in your network against a set of allow/block lists to determine if they will be retrieved or not.
In more complex terms, it is a DNS validation utility that compares DNS requests from devices in your network against a set of lists and RegEX parameters to either allow them to be resolved, or to have a value of 0.0.0.0 returned, thus never allowing the resource to be retrieved.
Initially, as the name suggests, the pi-hole was designed to run on a raspberry pi, but in actual fact it can run on any Linux operating system, whether that be on a raspberry pi (or similar), in a docker container, or in a virtual machine – either hosted in your own network, or even in the cloud.
What is DNS?
If you already know about DNS – skip past this bit, but for the uninitiated – read on…
The Internet identifies resources via a unique numeric value known as an IP address. Humans however, find IP addresses a pain to remember, so on the WWW, we like to refer to things with words instead.
For example, The Internet knows that the bbc website lives at 212.58.233.254, but we know the bbc website is at https://www.bbc.co.uk
When you type the bbc web address in a browser, a DNS query is transmitted out of your network to a server asking for the corresponding IP address

The server will respond with a suitable answer for the request – the request may contain more than 1 IP address which is quite common in the modern Internet as many sites are available on multiple cloud-hosted servers for resilience.
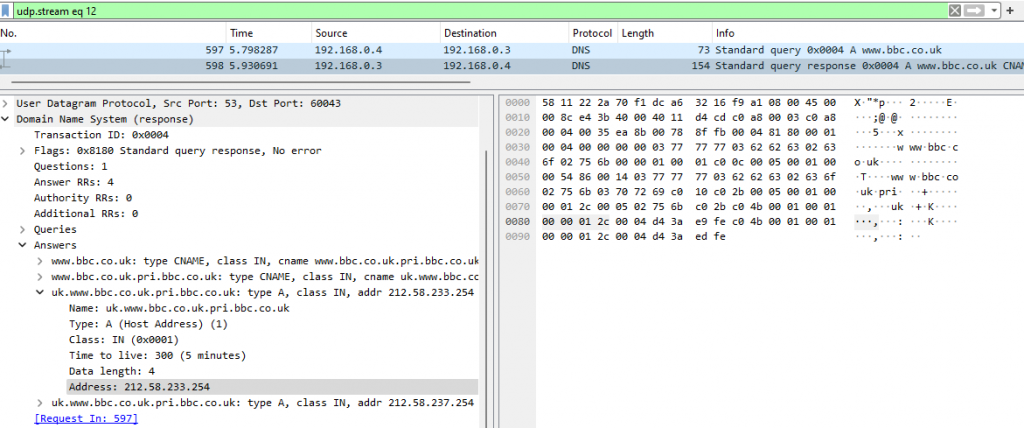
Once your browser has the IP address it needs, it will send a new data stream out to that service requesting the relevant web page data.
OK, so why is the Pi-hole so useful?
When you visit a webpage, your browser will download all the HTML that makes the page display on your screen, but in that HTML, there will be hidden data that makes the browser go out and fetch other data, most of which will be from advertising agencies, or tracking companies who get to know all about the web browsing you do.
If you use a pi-hole to filter all your DNS requests, the valid DNS queries will be allowed to go out and get resolved, but the ones for the ads, etc. will be blocked. This has the effect that not only do your webpages load faster because they aren’t being bogged-down by hundreds of extra requests for ads, they will be much easier to read (again due to no ads), but also those trackers will not be able to build a detailed picture of what you are doing online.
Below are a series of screen grabs for the Gloucestershire Live news website – viewed without using my pi-hole:
Note – I have zoomed-out of the page so you can see more of the data.

In the screen grab, you can see that the entire background of the site is an advert for Honda and there is an advert for Tesco half-way down the page.
Further down the page, there is an advert for Hotels.com

And further down, an advert for Vrbo

A bit further, we have an advert for Amazon:

And at the bottom, and advert for City Fibre

This screen shot is the same webpage viewed with my pi-hole running – the difference is quite staggering – not a single advert in sight.

But wait, there’s more…
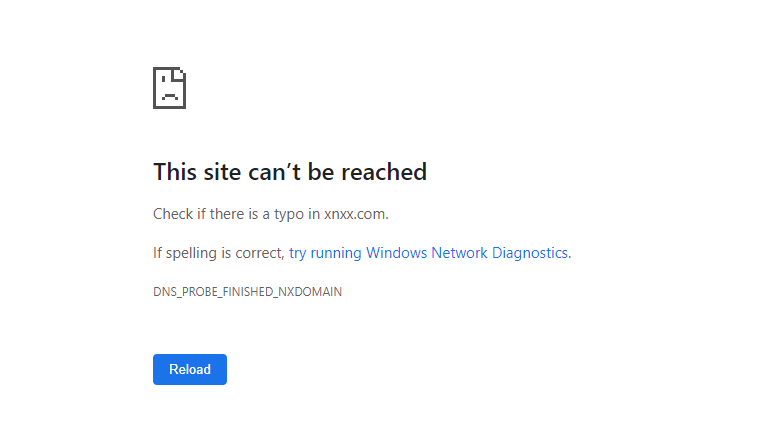
As well as blocking unwanted adverts and tracking links, the pi-hole can also be very useful at stopping you from accidentally accessing other, more nefarious web content, such as fake sites, sites with malware, phishing sites, sites with content you might not want to see (gore, adult content, etc.)
If you have young children at home, it is surprisingly easy for them to be able to access very inappropriate content at the click of a button, with a pi-hole you can make sure that this doesn’t happen.
In this screenshot, you can see the result returned when trying to access the adult website xnxx.com
OK, you’ve sold it to me – where do I start?
The first thing you need to do is decide how you are going to run your pi-hole
- On a physical raspberry pi?
- In a docker container?
- In a virtual machine?
I suppose it all depends on how confident you are at building VM’s, or containers if you want to go that route, but personally, I prefer the physical raspberry pi for the fact that you don’t have to leave a PC on liek you would if you run it in a container, or a VM.
Yes, you do have to leave the pi on, but the power consumption of a raspberry pi is tiny in comparison to a PC, plus if you need to switch the PC off to do any maintenance or a reboot due to an update, you will lose your pi-hole whilst the system is down. A raspberry pi can stay online almost 100% of the time. Even an update would only take the pi offline for a minute or less.
At the time of writing, raspberry pi’s are still in short supply, but if you keep checking RS components, or the pihut, they do come in stock regularly, so you should be able to get a pi fairly quickly.
With regard to which pi you should buy, then so long as it meets the minimum spec for running the pi-hole software, you should be good to go.
It is recommended that you have a device that has
- Min. 2GB free space, 4GB recommended
- 512MB RAM
Most people tend to go for the raspberry pi 4 Model B with a 128GB memory card
Setting up the Pi
Once you have your raspberry pi, the first thing you will need to do is install an operating system on it.
I’m not going to go through this process here, as it will depend which OS you decide to use. I run my pi-hole on a Ubuntu OS, but for newcomers, you might find the raspberry OS an easier route to follow.
This link will take you to the official raspberry pi documentation for setting up a new raspberry pi.
Just note that whilst you set up your pi, you will need to have it connected to a monitor and have a keyboard and mouse plugged-in to it.
OK, I have an OS – now what?
Once you have your raspberry pi up and running, it’s time to head over to pi-hole.net for the instructions on how to install and configure the pi-hole.
The installation process is very straightforward and takes only a few minutes to complete.
In the next blog, I will explain what you need to do post installation to get your network devices using your new pi-hole service.